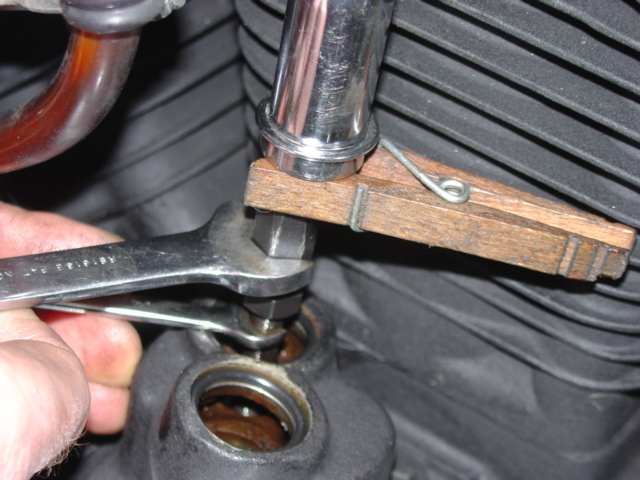
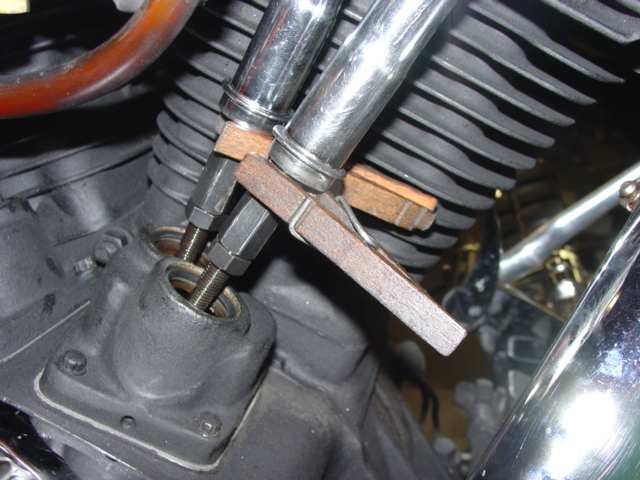
Here is a very easy and effective way to hold the tubes out of the way while adjusting the pushrods.


To adjust pushrods that you may no longer have the instruction sheets for or may have come in a bike when purchased, you can figure out the adjustments as follows.
The number of flats to turn the nut for proper pushrod adjustment can be calculated easily. First you have to find the number of threads per inch (tpi) on the adjusters. To do this simply measure 1 inch of threads and count them.
The tappet plunger moves aproximately .190" and the adjustment is in the middle or at about .100". To figure the number of flats for a .100" adjustment, use the following formula... number of flats=.100"/[1"/(tpi*6)]
For example, an adjuster turned 3 turns (18 flats) @ 30 tpi will make the pushrod .100" longer.
30tpi*6=180 (Threads per inch TIMES 6 = 180)
1"/180=.0055555 (1 inch DIVIDED BY the answer from above, in this case 180)
.100"/.0055555=18 flats (.100" is the amount of desired pushrod movement DIVIDED BY the answer from above .0055555 and EQUALS the number of wrench flats to obtain the desired adjustment.)
To further explain this....
tpi TIMES 6 gives the total number of wrench flats in 1" of the adjuster. 30tpi TIMES 6 wrench flats per thread EQUALS 180 wrench flats per inch.
1 inch DIVIDED BY the total number of flats (180) EQUALS the amount of travel for 1 wrench flat (.0055555")
Total travel desired (.100") DIVIDED BY the amount of travel per wrench flat (.0055555") EQUALS the number of wrench flats to achieve the desired travel (18 flats).
Thats the long technical explination. The easy way is to take the number of threads per inch and multiply by .6
For example ....
24tpi TIMES .6 EQUALS 14.4 flats
30tpi x .6 = 18 flats
32 x .6 = 19.2
And this will give you the correct adjustment for any manufactures adjustable pushrods that are used with stock style hydaulic lifters.
To Adjust the Pushrods....
Watch the rear cylinder pushrods or lifters.
Turn the engine over (by hand) until you see the cam overlap for the rear cylinder. That is when exhaust lifter is traveling down and the intake lifter is traveling up (closing the exhaust valve and opening the intake valve).
Once you find that for the rear cylinder, the FRONT cylinder will be on its compression stroke. You can now adjust the front cylinder pushrods.
With the pushrods loose, tighten them until there is no up and down play. The pushrods should be able to rotate easily with your fingers but should not move up and down any.
Using the information above to calculate the pushrod adjustment, adjust both FRONT pushrods that amount and lock them down with the lock nut.
DO NOT SKIP THIS STEP. Wait 15 to 20 minutes for the lifters to bleed down after adjusting the pushrods. If you are on the second cylinder wait 15-20 minutes before starting the engine. You can check to see if the lifters have bled down by turning the pushrods with your fingers.
DO NOT turn the engine over until you can rotate the pushrods with your fingers. If they don't bleed down find out what is wrong before trying to turn the engine over.
This completes the adjustment for the front, Now start over again only look for the cam overlap in the FRONT cylinder and adjust the rear.
Hint, if there is no cam overlap then watch for the exhaust valve close followed immediately by the intake valve open.
Another hint, adjust the intake pushrod before installing and adjusting the exhaust pushrod for the given cylinder. It is much harder to adjust the intake pushrod after the exhaust pushrod is in place.
Even more hints, lift the rear wheel and put the tranny in gear then using your hand to turn the tire makes it easy to turn the engine over by hand. Don't forget to take it out of gear before you start it.